How to set up and track spatial controllers
Pair the controllers and connect them with your app. Set up an ARKit session to track them in space.
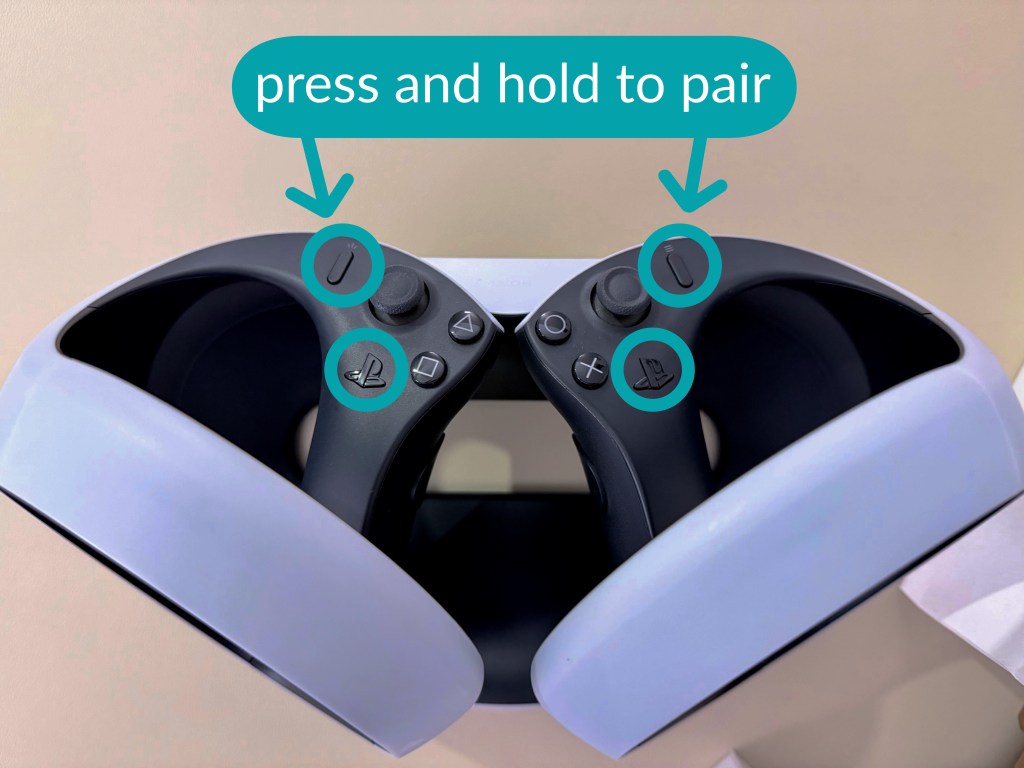
Pairing the Controllers
visionOS 26 supports PS VR 2 Sense Controllers. Let’s start by making sure they are paired with Apple Vision Pro.
My controllers were already paired with a PlayStation 5. This is what I did to remove them.
- Open the Settings app on PlayStation 5 and navigate to Bluetooth.
- Forget (or delete) each controller (not Disconnect).
- Turn off the PlayStation (putting it in standby kept detecting and reconnecting the controllers).
To pair the controllers to Apple Vision Pro:
- Press and hold the PS Button and Options/Capture button on a controller. You should see the light at the bottom of the controller start to flash.
- Open Settings in Apple Vision Pro and navigate to Bluetooth.
- Select each controller to pair.
Bonus: you can rename paired Bluetooth devices. I noticed the default names were too long to display in the widget. Add the battery widget to your space to keep an eye on remaining power.

Now that the controllers are paired, you should be able navigate visionOS. You can use the trigger to simulate a pinch. You can also press the PS button to open Home. It seems all other buttons and input are reserved for developers to use in apps.
Using Tracked Controllers in a Project
A short outline of the steps we need to take.
- Add the Game Controller capability and select Spatial Gamepad. See the docs
- Warning: see below
- There are two notifications we can monitor for connection status.
- We can filter the controllers found during the events spatial only
- Start an ARKit Session
- Read anchor updates
- Inspect each anchor for chirality (left or right controller)
- Use anchors as needed in the scope of our game or app
Warning: keep an eye on your plist file. In September 2025, Xcode 26 has a bug that damages or removes existing ARKit values in the plist when selecting the Spatial Gamepads option in Signing & Capabilities. I was able to work around this by editing my plist manually.
<?xml version="1.0" encoding="UTF-8"?>
<!DOCTYPE plist PUBLIC "-//Apple//DTD PLIST 1.0//EN" "http://www.apple.com/DTDs/PropertyList-1.0.dtd">
<plist version="1.0">
<dict>
	<key>NSHandsTrackingUsageDescription</key>
	<string>Hand tracking is required for this app to function</string>
	<key>NSWorldSensingUsageDescription</key>
	<string>World tracking is required for this app to function</string>
  <key>NSAccessoryTrackingUsageDescription</key>
  <string>Accessory tracking is required for this app to function</string>
	<key>GCSupportedGameControllers</key>
	<array>
		<dict>
			<key>ProfileName</key>
			<string>SpatialGamepad</string>
		</dict>
	</array>
	<key>UIApplicationSceneManifest</key>
	<dict>
		<key>UIApplicationPreferredDefaultSceneSessionRole</key>
		<string>UIWindowSceneSessionRoleApplication</string>
		<key>UIApplicationSupportsMultipleScenes</key>
		<true/>
		<key>UISceneConfigurations</key>
		<dict>
			<key>UISceneSessionRoleImmersiveSpaceApplication</key>
			<array>
				<dict>
					<key>UISceneInitialImmersionStyle</key>
					<string>UIImmersionStyleMixed</string>
				</dict>
			</array>
		</dict>
	</dict>
</dict>
</plist>Apple has some resources to help us get started.
- WWDC 2025: Explore spatial accessory input on visionOS
- Sample: Tracking a handheld accessory as a virtual sculpting tool
- Sample: Tracking accessories in volumetric windows
We’re going to base the work below on that second sample project. For now, let’s focus on the minimal code needed to connect and start tracking our controllers. We’ll build up to some more advanced features in future posts.
Tracked Controllers are implemented using two existing technologies. We’ll import GameController to work with controllers and buttons and ARKit to work with data providers and anchors.
Following Apple’s lead in using an @Observable class to keep track of ARKit features, we’ll add this to the AppModel for now. We want to expose tracking data to the Window and to an Immersive Space. In a real app, it would be better to implement this only for the views that need to access it. We can add the game controller notifications to the initializer, then respond to them when needed. We can check the productCategory of each connected controller to look for GCProductCategorySpatialController.
Keep in mind that a user can have multiple controllers / accessories paired at any given time. We’ll update our ARKit session to track any valid connected spatial controllers. We do this by calling trackAllConnectedSpatialControllers.
class AppModel {

    // Immersive Space state
    let immersiveSpaceID = "ImmersiveSpace"
    enum ImmersiveSpaceState {
        case closed
        case inTransition
        case open
    }
    var immersiveSpaceState = ImmersiveSpaceState.closed

    // ARKit Controller Tracking
    let arkitSession = ARKitSession()
    var trackingState: TrackingState = .startingUp

    // Are we connected? Use in ContentView to show and hide cards.
    var leftControllerConnected = false
    var rightControllerConnected = false

    // We'll have the anchors update these transforms for now. We'll swap these out for Entities later.
    var leftTransform: Transform?
    var rightTransform: Transform?

    /// internal state
    enum TrackingState: String {
        case startingUp = "Starting Up"
        case trackingNotAuthorized = "Tracking Not Authorized"
        case trackingNotSupported = "Tracking Not Supported"
        case noControllerConnected = "No Controller Connected"
        case arkitSessionError = "ARKit Session Error"
        case tracking = "Tracking"
    }

    init() {

        NotificationCenter.default.addObserver(forName: NSNotification.Name.GCControllerDidConnect, object: nil, queue: nil) { notification in
            if let controller = notification.object as? GCController {
                switch controller.productCategory {
                case GCProductCategorySpatialController:
                    Task { @MainActor in
                        print("A spatial controller connected")
                        self.trackAllConnectedSpatialControllers()
                    }
                default:
                    print("A standard controller connected")
                }
            }
        }

        NotificationCenter.default.addObserver(forName: NSNotification.Name.GCControllerDidDisconnect, object: nil, queue: nil) { notification in
            if let controller = notification.object as? GCController {
                switch controller.productCategory {
                case GCProductCategorySpatialController:
                    Task { @MainActor in
                        print("A spatial controller disconnected")
                        self.trackAllConnectedSpatialControllers()
                    }
                default:
                    print("A standard controller disconnected")
                }
            }
        }
    }

    ...

}
Let’s create trackAllConnectedSpatialControllers. We can build a list of tracked accessories. Then we check to make sure we have accessories in this list before we fire up an ARKit Session with AccessoryTrackingProvider
private func trackAllConnectedSpatialControllers() {
        Task {
            // Make sure we can actually use tracked controllers
            guard trackingState != .trackingNotSupported && trackingState != .trackingNotAuthorized else {
                print("Can't run ARKit session: \(trackingState)")
                return
            }

            // Build a list of valid accessories
            var accessories: [Accessory] = []
            for spatialController in GCController
                .controllers()
                .filter({ $0.productCategory == GCProductCategorySpatialController }) {
                do {
                    let accessory = try await Accessory(device: spatialController)
                    accessories.append(accessory)
                } catch {
                    print("Error during accessory initialization: \(error)")
                }
            }

            // Update our state and exit if we don't have valid accessories
            guard !accessories.isEmpty else {
                print("CONTROLLER nothing to process")
                trackingState = .noControllerConnected
                leftControllerConnected = false
                rightControllerConnected = false
                arkitSession.stop()
                return
            }

            // Set up and run an ARKit Session
            let accessoryTracking = AccessoryTrackingProvider(accessories: accessories)

            do {
                try await arkitSession.run([accessoryTracking])
                trackingState = .tracking

            } catch {
                // No need to handle the error here; the app is already monitoring the
                // session for errors in `monitorSessionEvents()`.
                return
            }

            for await update in accessoryTracking.anchorUpdates {
                process(update)
            }
        }
}Once the session is active, we can start listening for anchor updates.
for await update in accessoryTracking.anchorUpdates {
  process(update) // see below
}We’re not doing much to process the updates just yet. We update the controller connected state when an anchor is added or removed. We also update the transforms when an anchor is updated.
    private func process(_ update: AnchorUpdate<AccessoryAnchor>) {
        switch update.event {
        case .added:
            if(update.anchor.accessory.inherentChirality == .left) {
                leftControllerConnected = update.anchor.isTracked
            } else {
                rightControllerConnected = update.anchor.isTracked
            }

        case .updated:
            if(update.anchor.accessory.inherentChirality == .left) {
                leftTransform = Transform(matrix: update.anchor.originFromAnchorTransform)
            } else {
                rightTransform = Transform(matrix: update.anchor.originFromAnchorTransform)
            }

        case .removed:
            if(update.anchor.accessory.inherentChirality == .left) {
                leftControllerConnected = update.anchor.isTracked
            } else {
                rightControllerConnected = update.anchor.isTracked
            }
        }
}Video Demo
Let’s see what we have so far.
Example Code.
You can find the Xcode project for this series in our Example Code Projects repo. Look for StepIntoTrackedControllers. This is very much a work-in-progress. Expect it change a lot over the next few days and weeks.
Support our work so we can continue to bring you new examples and articles.
Download the Xcode project with this and many more examples from Step Into Vision.
Some examples are provided as standalone Xcode projects. You can find those here.
Follow Step Into Vision